Introduction
Hello! My name is Christopher. I am providing these setup instructions for a bit of code that I wrote to control the ‘Looper’ device in Ableton. It is setup to work with any two button elements (tested on EF44 encoders. button presses only). I’m hoping that it provides some value or inspires some ideas for other setups.
The following instructions will go through setting up the top two, leftmost encoders (only the button elements) on an EF44.
As there a parts of the LUA code that reference elements using element[ ]:button_value() , there will need to be some changes to the LUA code to suite your needs. I will highlight these areas and clearly explain how and why they need to change.
There are also static settings for the MIDI CCs being sent. If these need to be change due to conflicts in your setup, I will highlight where to update the CCs and point out what each CC is controlling. The MIDI channel can be changed in the ‘init’ block for button 1.
Lastly, due to character constraints regarding the LUA scripts, some code might be ‘right up against the ceiling’ for limits. I have set static colors for the different ‘Looper’ events. Changing the RGB values might be enough to hit that ceiling. My color choices seem logical to me but might not for others. There’s not a lot of wiggle room due to these restrictions. That being said, if you have any form of CVD (color vision deficieny) and need different colors setup, please feel free to message me. I can set something up that works for you and share the results here.
Requirements
- A Grid controller with button elements: PBF4, BU16, EF44, EN16, or TEK2
- A copy of Ableton Live Intro or higher with the ‘Looper’ Device (this appears to have come out in version 8 of Live)
Usage
-
Initial click of button 1 starts recording - LED pulses red.
-
Second click of button 1 starts playback (which stops recording) - LED is solid green.
-
Third click of button 1 starts overdubbing - LED pulses light blue.
-
Subsequent clicks of button 1 toggles between playback and overdubbing - LED responds accordingly.
-
Clicking button 2 stops playback and readies button 1 to start playback cycle - LED off while stopped.
-
Long-press of button 2 clears the loop and re-initializes button 1 for recording (record ready) - LED flashes red after MIDI event is sent. LED if off once button is released.
Note: ‘undo/redo’ take is currently not accounted for. An additional Grid controller element would be needed.
Grid Controller Setup Instructions
-
Open the Grid Editor program and connect your module.
-
Open the ‘Configuration Editor’ side panel by clicking on the top-most button on the left-side tool bar ( Circle with a line on the left inside icon).
-
On the button to be used for button one, select the ‘Init’ tab and remove all action blocks.
Note: Any color layers referencing layer 2 are used for interacting with encoder turns. I am removing these on my encoders as I this was setup for buttons and I, personally, would not want color interactions on either knob for encoder turns on this setup
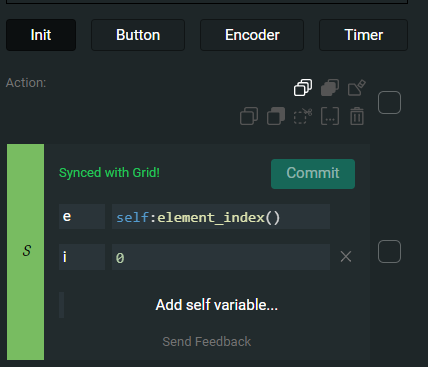
- On the button one ‘Init’ tab, create a new ‘Self’ variables action block and set it up as follows:
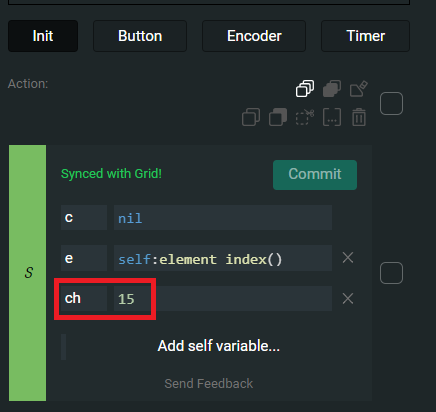
The self.ch variable (highlighted) is for the MIDI channel that this setup uses. Change this as needed. Note that, Grid starts at channel 0 and goes to 15 (instead of 1 - 16). All MIDI interactions are done on button 1. Updating this variable sets the channel for all MIDI interactions for this two button setup.
-
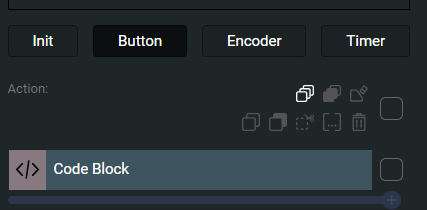
On the button 1 ‘Button’ tab, erase all action blocks.
-
On the button 1 ‘Button’ tab, create a new ‘Code’ action block ( 'Add action block…" button at the bottom of the screen)
local v, s = self:button_value(), self:button_state()
if s > 0 and c == nil then
	r(self.e, self.ch, 49, 255, 0, 0, 1)
	c = 1
elseif s > 0 and c == 1 then
	r(self.e, self.ch, 50, 0, 255, 0, 0)
	c = 2
elseif s > 0 and c == 2 then
	r(self.e, self.ch, 51, 0, 255, 255, 1)
	c = 3
elseif s > 0 and c == 3 then
	r(self.e, self.ch, 50, 0, 255, 0, 0)
	c = 2
elseif v == 2 then
	r(self.e, self.ch, 52, 0, 0, 0, 0)
	c = 1
elseif v == 3 then
	r(self.e, self.ch, 53, 0, 0, 0, 0)
	c = nil
end
Note: I like to hit the ‘Store’ button to write the code to the device at each step. This way, if the module disconnects or something crashes, I’m only having to re-do things from the last ‘Store’ point.
Next, we’ll setup button 2.
-
On the button to be used for button 2, select the ‘Init’ tab and remove all action blocks.
-
On the button 2 ‘Init’ tab, create a new ‘Self’ variables action block and set it up as follows:
-
On the button 2 ‘Button’ tab, erase all action blocks.
-
On the button 2 ‘Button’ tab, create a new ‘Code’ action block.
-
Click on the new ‘Code’ action block to expand it hen click on ‘Edit Code’.
-
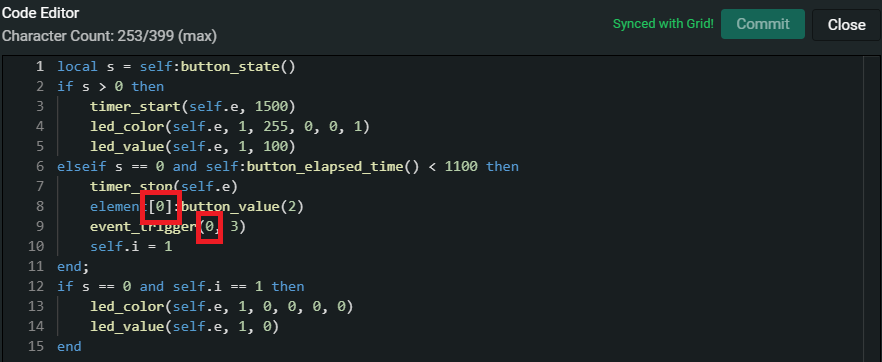
Copy and paste the following code into the ‘Code Editor’ then hit the ‘Commit’ button:
local s = self:button_state()
if s > 0 then
	timer_start(self.e, 1500)
	led_color(self.e, 1, 255, 0, 0, 1)
	led_value(self.e, 1, 100)
elseif s == 0 and self:button_elapsed_time() < 1100 then
	timer_stop(self.e)
	element[0]:button_value(2)
	event_trigger(0, 3)
	self.i = 1
end;
if s == 0 and self.i == 1 then
	led_color(self.e, 1, 0, 0, 0, 0)
	led_value(self.e, 1, 0)
end
-
On the button 2 ‘Timer’ tab, click on the ‘Code’ action block to expand it.
-
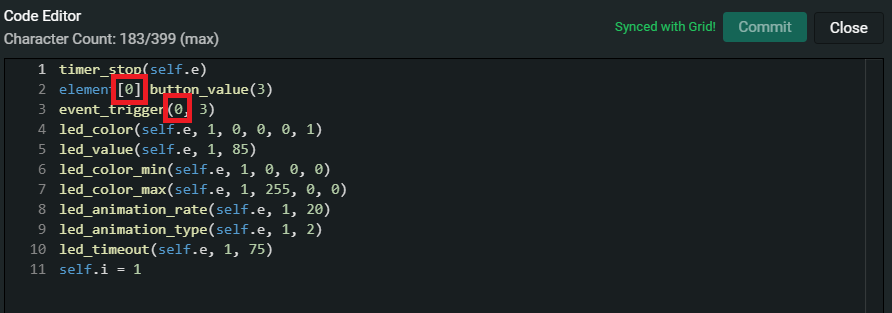
Copy and paste the following overwriting the existing code in the ‘Code Editor’ then hit the ‘Commit’ button:
timer_stop(self.e)
element[0]:button_value(3)
event_trigger(0, 3)
led_color(self.e, 1, 0, 0, 0, 1)
led_value(self.e, 1, 85)
led_color_min(self.e, 1, 0, 0, 0)
led_color_max(self.e, 1, 255, 0, 0)
led_animation_rate(self.e, 1, 20)
led_animation_type(self.e, 1, 2)
led_timeout(self.e, 1, 75)
self.i = 1
Lastly, we’re going to define a function on the ‘System’ ‘Init’ tab.
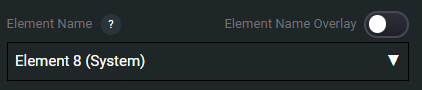
- Using the drop down at the top of the ‘Configuration Editor’ side pane, select the last ‘element’ in the list. This will be ‘Element X (System)’:
Note: As each Grid module has a different number of control elements, your (System) element might be different number than what’s pictured. Regardless, it should always be the last element in the drop down and will definitely be the only one that says “(System)”
-
Select the ‘Init’ tab on the ‘System’ element that you just selected.
-
Click on the ‘Code’ action block to expand it then click on ‘Edit Code’.
-
Copy and paste the following code into the ‘Code Editor’ then hit the ‘Commit’ button:
function r(e, ch, cc, r, g, b, s)
	led_color(e, 1, r, g, b, 1)
	led_value(e, 1, 85)
	led_animation_rate(e, 1, s)
	led_animation_type(e, 1, 3)
	midi_send(ch, 176, cc, 127)
end
Additional LUA code changes need to be done depending on which buttons and Grid controller you are using. Button 2 triggers events on button 1 using element[X]:button_value() where ‘X’ is the physical position of the button element you are using for button 1. ‘X’ will need to be changed in four places to match the element location of your ‘button 1’.
The first two places to update this are:
- Button 2 ‘button’ code block.
The next two places to update are:
- Button 2 ‘timer’ code block.
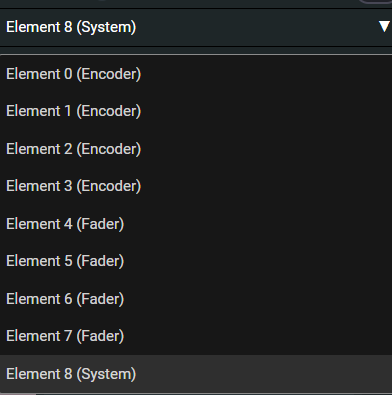
You will need to replace ‘0’ with the element number of your button 1. For example, on my EF44, the top left encoder is element ‘0’ and the bottom right encoder is ‘15’. You can see the element number in the name of the current element that you are working on in the ‘Configuration Editor’ drop down box:
We have now added all of the code to the Grid controller. Make sure to click the ‘Store’ button to save the configuration onto the controller.
Now would be a good time to save a new ‘Profile Cloud’ profile for your controller.
Ableton Live Setup Instructions
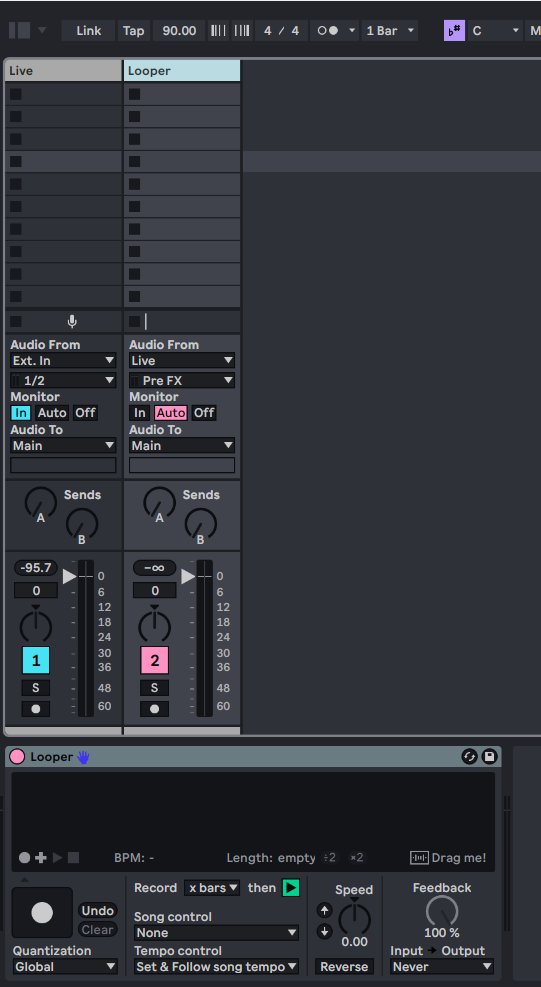
In Ableton, setup your Looper environment. In this example, I have two ‘Audio’ tracks; one for ‘Live’ and a second for ‘Looper’:
Note: Your audio routing preferences will likely vary but, I prefer not to print my effects into my loops. I have the ‘Audio From’ settings on the ‘Looper’ track set to ‘Pre FX’. This would allow me to send both the ‘Live’ and ‘Looper’ tracks to an effects send but not have those effects printed into the loop. Your audio routing and other Ableton setup have no impact on the Looper device control.
Next, we will map the Grid buttons to their corresponding ‘Looper’ elements.
-
First, on your Grid controller, long press button 2 until it flashes red then release it. This will make sure that button 1 is in the ‘record ready’ state.
-
Next, in Ableton, enter ‘MIDI Learn’ mode by clicking on the ‘MIDI’ button in the top right corner or by pressing CTRL + M (Windows) or CMD + M (Mac). The MIDI mappable elements in Ableton will have a blue overlay.
-
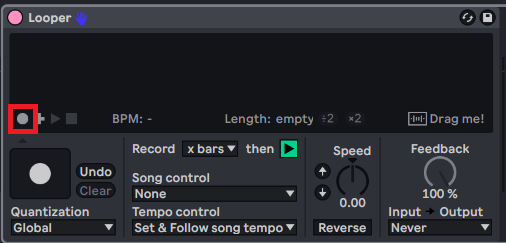
On the ‘Looper’ device, click the small ‘Record’ button then press button 1 on Grid once:
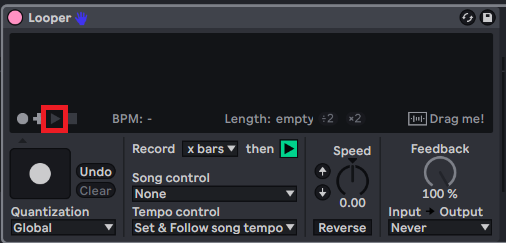
- Next, on the ‘Looper’ device, click the small ‘Play’ button then press button 1 on Grid once:
- Next, on the ‘Looper’ device, click the small ‘Overdub’ button then press button 1 on Grid once:
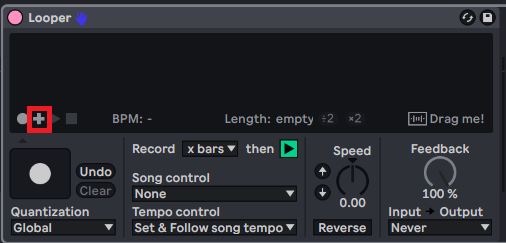
Next, on the ‘Looper’ device, click the small ‘Stop’ button then press button 2 on the Grid once:

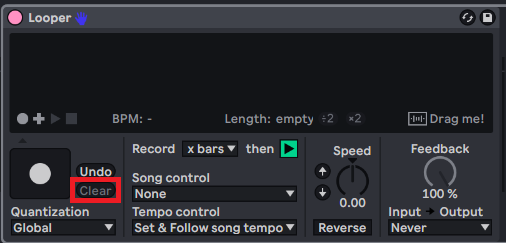
- Last, click the ‘Clear’ button on the ‘Looper’ device then long press button 2 on Grid. Hold the button until the LED flashes red then release it:
- Exit MIDI Learn’ mode by clicking on the ‘MIDI’ button in the top right corner or by pressing CTRL + M (Windows) or CMD + M (Mac). The blue overlay disappears.
Reset Grid back to ‘record ready’ by long pressing button 2.
That’s it! You should now be able to control the ‘Looper’ device using two buttons from your Grid controller!
Please feel free to ask questions! 
I’ll start a new reply with some additional Grid element setups that might enhance the looping workflow.