BU16 & 2 actions

Yes, it’s good, my knot works very well today! I did a manipulation, and everything is fine.
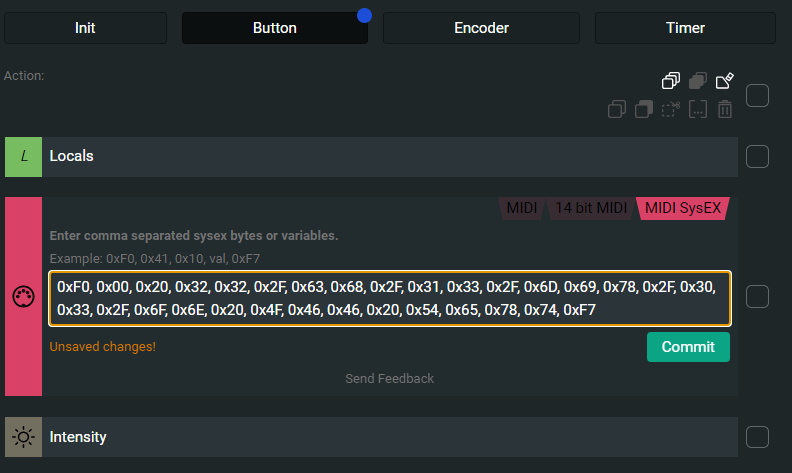
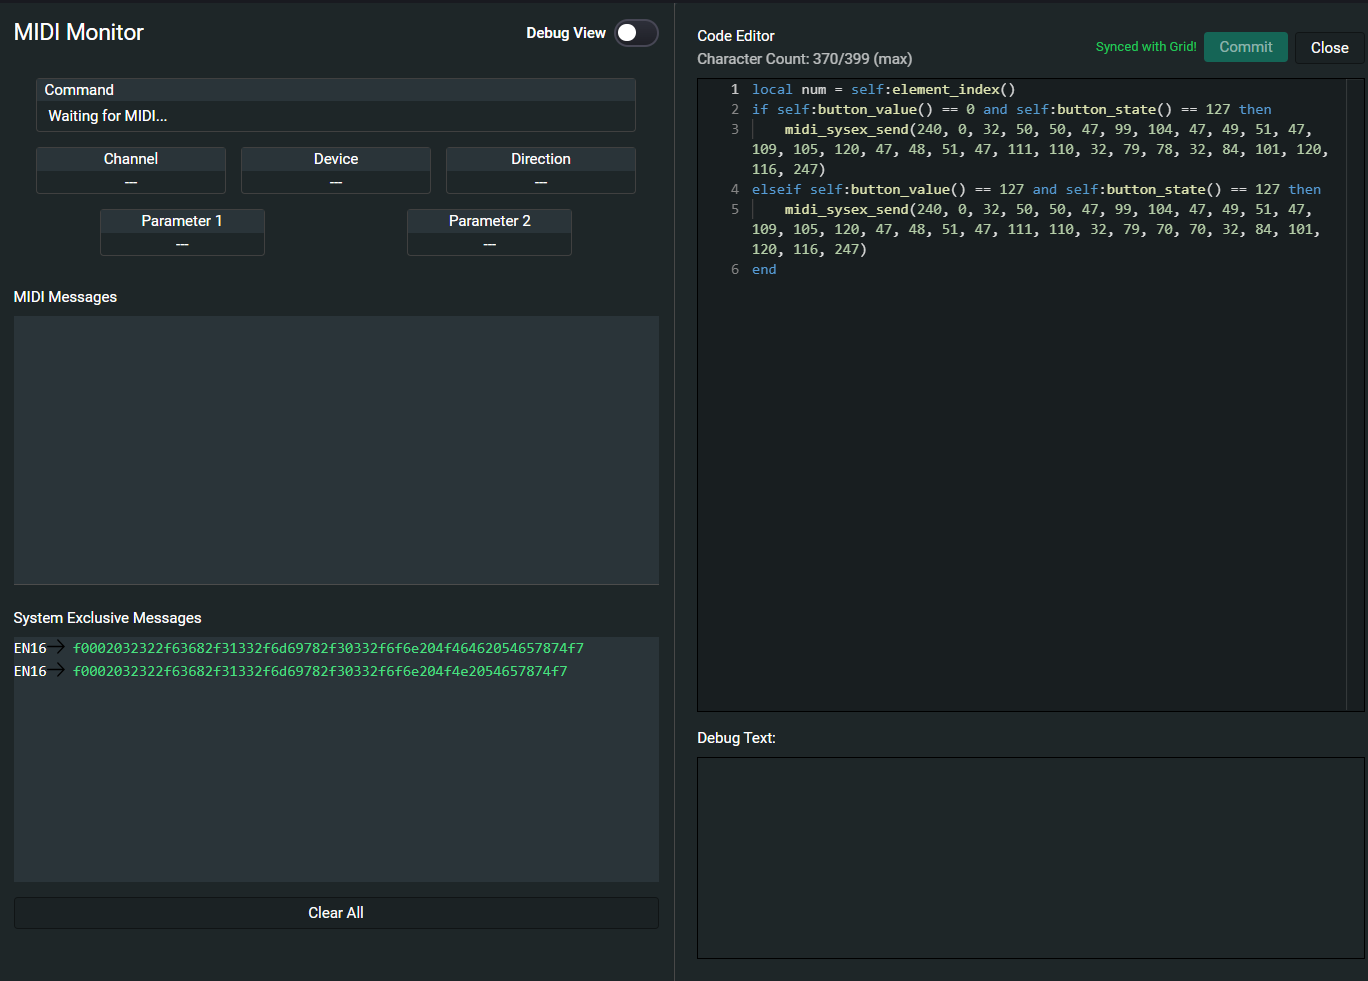
I will continue to test code variants, how do you go about passing hexadecimal sysex codes in (240, 20, etc…)?

Don’t take into account my thoughts regarding the word “val” :wink:
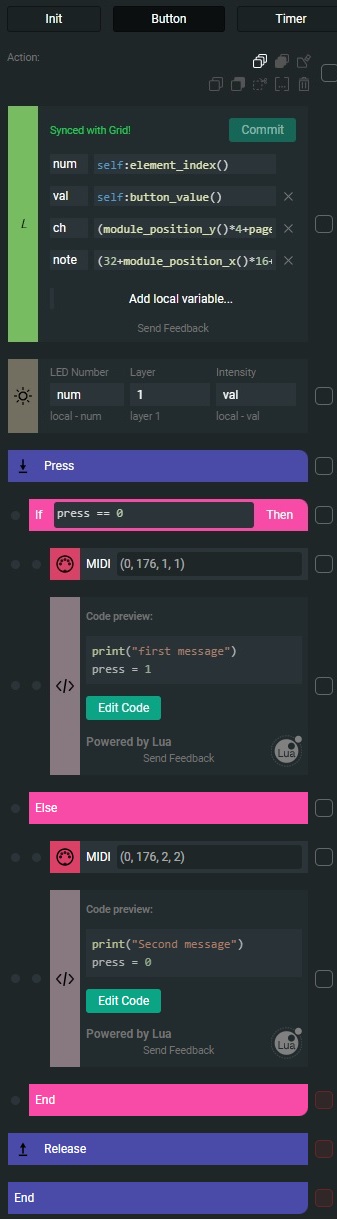
And yes, I actually want a button to activate with a first message and deactivate with a second message ^^

Intech sent me an example of a button configuration, but there are so many blocks that there is no more room for the sysex codes (this would work with midi CCs but that’s not what I want ).

You would put in the 0x00 format hex code directly into a MIDI Sysex Action Block like this and click the ‘Commit’ button:

Where you see ‘val’ in the example code (in grey above the input box), that is the value of the button. For a MIDI CC toggle, it toggles button_value() between ‘0’ and ‘127’. It’s obvious why this is needed for a CC toggle. I’ve just always thought sysex was for more low level things that aren’t covered by CC/NRPN. But, your use case might actually need to send 0 or 127 to indicate an on/off state. It would be a matter of determining where in those hex bytes ‘val’ needs to be. That might need a skim of the MIDI sysex standard as there’s likely an order of bytes that tell the receiver the type of message, channel, value etc.

When you do that, the code that’s actually generated is this:

And when you use an control element to send it out as sysex, it sends this:

Hex

If you want to work directly with code blocks, like I’ve been posting my examples in (as it’s the only way I know how to clearly write my ‘IF’ statements), you can input the exact same 0x00 format hex into the midi_sysex_send() function like this:

When you click on ‘Commit’, it is automatically converted to the decimal format like this:

And still sends out this when you use the control element:

Hex


There are action blocks for IF/ELSIF/ELSE statements but, for me, in the last few weeks of owning my Grids, I find it much easier to just use code blocks. I start with action blocks, then convert them to see what’s actually happening. This certainly isn’t the only way to approach configuring things. A person could certainly use only Action Blocks to configure things. I just happen to find it a bit clunky. Your mileage may vary. :slight_smile:

If you find your code is too many characters for what you want to send, there’s likely some default variable that can be removed. from the ‘Locals’ blocks of the ‘Button’ and ‘Init’ tab. There’s some code for ‘ch’ and ‘cc’ that have maths that auto-assign a MIDI channel and CC based on how the Grids are connected. I don’t ever want things auto-assigned so I change the code in each of those variables to be the MIDI channel and CC that I need to use. If your button element is not using CC then, you could delete that variable entirely. Same goes for then channel variable if you are not needing to send on a specific channel or are otherwise never needing to reference that variable.

The ‘Init’ tab also has some variables for ‘red’ ‘gre’ ‘blu’ to auto-generate some colors for the LEDs. Again, I explicitly configure the colors that I want so I remove those. You need to change up the led_value() functions and the led_color() functions if you’re going to statically assign things though. It’s pretty easy to follow what’s going on with that.

1 Like

This is an excellent and rather exciting method you have there. So I tried on my side but for the moment, I only transmit one sysex code (the second press sends the same code)…
I’m starting to think that it’s still possible, I need to find the subtleties in the code… To be continued!

1 Like

Could you share the code here?

Here is your code, with the two sysex messages checked…
You will see that with each press, only the first code is transmitted.

local num = self:element_index()

if self:button_value() == 0 and self:button_state() == 127 then

midi_sysex_send(240, 0, 32, 50, 50, 47, 99, 104, 47, 49, 51, 47, 109, 105, 120, 47, 48, 51, 47, 111, 110, 32, 79, 78, 32, 84, 101, 120, 116, 247)

elseif self:button_value() == 127 and self:button_state() == 127 then

midi_sysex_send(240, 0, 32, 50, 50, 47, 99, 104, 47, 49, 51, 47, 109, 105, 120, 47, 48, 51, 47, 111, 110, 32, 79, 70, 70, 32, 84, 101, 120, 116, 247)

end

If it helps, here is what intech support sent me (their example works but it takes too many characters, impossible to integrate my sysex codes)

Thanks for posting this @phmodular! The code example from support wouldn’t work for you specific needs for reasons I can detail later. I’m just getting ready for work and I’m on the go a lot today. Those code blocks would obviously need tweaks and I can step through what can be removed and what would need to be modified (and why). Just so you can see what’s going on there.

As for my code, in the Grid editor, you can see the MIDI output/debug information by opening the ‘MIDI Monitor’ (bottom left. Icon looks like a 5-pin DIN connector). As you can see in this screen snip, both values are being sent. The midi_sysex_send() is the first message in the MIDI Monitor on the first button press and the second midi_sysex_send() is the second message in the MIDI Monitor on the second press:

If you only see one message every two button presses then, your ‘Init’ tab might be missing the button mode action block ‘BC = 1’. This sets the button element to ‘Toggle’ instead of the default ‘Momentary’:

Grid - BC Mode

The last thing I would check is the second midi_sysex_send() function in my code. We know that the first button press is sending and working (is it? is it change the parameter on your Behringer as you expect?). If after confirming your ‘BC’ is set to ‘1’ and the button press is toggling the two values in the ‘MIDI Monitor’ it’s still not working, double check the the second midi_sysex_send(). Erase the decimal value parameters ((240, 0, 32, …)) and input your HEX values there ((0x00, 0Xef, …)), commit it, and try again.

1 Like

You are a genius !
It works perfectly! (I understood the visualization of MIDI messages), as you guessed, I had not modified “init”.
So, each press takes me from one state to another, it’s great! I just have to take inspiration from this code for my other settings. I will add the ON Led to the first press and the Off Led to the second.
Sincerely, a thousand thanks, I would never have found this alone! And sorry for wasting your time, I wish you a nice day! :pray: :pray: :pray: :beers:
Christian

1 Like

My time was absolutely not wasted ;). I learned a lot from this as well. I’m happy we got it sorted out together.

I hope people realize that these controllers are really amazing. Yes, they work out of the box. Yes, they can be statically configured with channel and CC settings quite easily. However, they are very open-ended with what you can do with them. That will sometimes require learning a bit of LUA or mastering the ‘Action Blocks’. :smiley:

Cheers!

Christopher

1 Like

I realize that this is very scalable. As you say, you have to delve into the LUA language which I didn’t know…
I may ask for your help (again) if I can’t activate the LED, but I’ll let you go to work ^^
THANKS AGAIN Christopher!

1 Like

Christopher, I just wanted to tell you that I passed the code for the LEDs, it’s thanks to you, thank you for your help on this forum!
Christian

1 Like

Happy to help! Feel free to ask for help if you run into issues again. Though, I’d likely start a new thread so that new users can see the issue that is being worked on.

1 Like

Hi,
I’m definitely no coder. I’m looking for a simple solution for a similar thing.

I need a toggle button to alternate between two different CC messages (CC49 and CC50)

I wonder if anyone tech savvy can assist?
Alex

1 Like

This would be easy to do. :slight_smile:

Is this for an encoder or just a button? If it’s an encoder, are you looking to toggle between those CCs and send the value of the encoder turns? I.e. One state is CC49. You can turn the encoder and send its value. Then click the encoder and be able to send CC50?

It’s basically just the button for now.
It’s for an Ableton looper. I need the light to be lit when it’s recording.

Is it just for looping on a clip? One button push starts recording and the next push does…?

As for lighting the LED on the button, that would be bi-directional MIDI. Ableton would need to send a CC message back then the Grid controller would need to interpret that and ‘do a thing’ (in this case, light an LED).

Edit: Not ever having done looping in Ableton, I’ve just learned there’s a ‘Looper’ device. Are you using this device?

It’s for the native looper yes.
I literately just need to know when it’s recording.
So I would want to map it to the multi-transport button, circled in the screenshot.

I know I said 2 different CC, cause I figured I would have to map the small icon ‘record’ and ‘play’ respectively. Either way setting up the standard toggle mode with one CC assigned to the multi-transport didn’t do the trick.

EDIT: I hope this makes sense - I’m tired :melting_face:

Thanks! This clarifies a lot. A toggle button won’t work for controlling the large multifunction button. You can still use one button to start recording, overdub, stop, and undo. You would need another button/CC to ‘Clear’ it.

The big button does the following:

First click: Record
Second click: Stops recording and starts playback
Third click: Engages ‘Overdub’
Forth click: Stops ‘Overdub’ and continues playback.
Double click: Stops playback
Hold does an ‘Undo’

With that in mind, you only need one button for the above. You would need another one to send a ‘Clear’ Message.

Both of these would be the default button type ‘Momentary’. By default/design, when you press a button, two events are sent; one on press and one on release. This about the only ‘odd’ thing that we need to account for.

Standby…

Also, lighting the LED when recording/overdubbing/playback can ‘likely’ be accommodated. Ableton would need to send MIDI messages back out when the Looper is in each one of these states. As I’ve never needed Ableton for a live scenario or where I want deep MIDI controller integration, I’ve not set this up. This would most assuredly be done through Ableton Live’s ‘Remote Scripts’. We’ll not be covering that here but…I’m trying to think of a way to do the LED lighting on the Grid itself without need for messages being sent to Grid. This will require some time to think through (I have an idea but would need to tinker).

Code/Action blocks incoming…

Also, which Grid controller are you using? If it’s one with encoders, we can setup the encoder turning to take care of some other things like ‘Clear’. Let me know :slight_smile:

Got everything working except the ‘hold’ to do an ‘Undo’. It works but the Looper also responds to it as a single-click event and responds accordingly. There might be a way to accommodate this on the Grid side of things with timers. Just taking some screen snips of the ‘button’ and ‘init’ configs to upload with some explanations.

1 Like

You’re a god damn genius! Incredible :)!

I’m on a PBF4