BU16 & 2 actions

Part 1 of ‘button’ config. Replace the values in ‘ch’ and ‘cc’ with the MIDI channel and CC you want to send. In this case, I’m sending CC 49 on MIDI channel 16 (Grid counts MIDI channels from 0 to 15 so 15 in Grid is actually channel 16)

Create an 'IF action block just below the 'Locals action block using the ‘Add action block…’ button at the bottom OR by moving your mouse cursor in between blocks. A blue divider will appear with a ‘+’ sign on the right. This way you can insert the block where you want. Recreate the ‘MIDI’ action blocks and ‘Intensity’ action blocks as well. When you add the ‘IF’ block, it does not add the ‘ELSE’ block. You’ll need to add that as well.

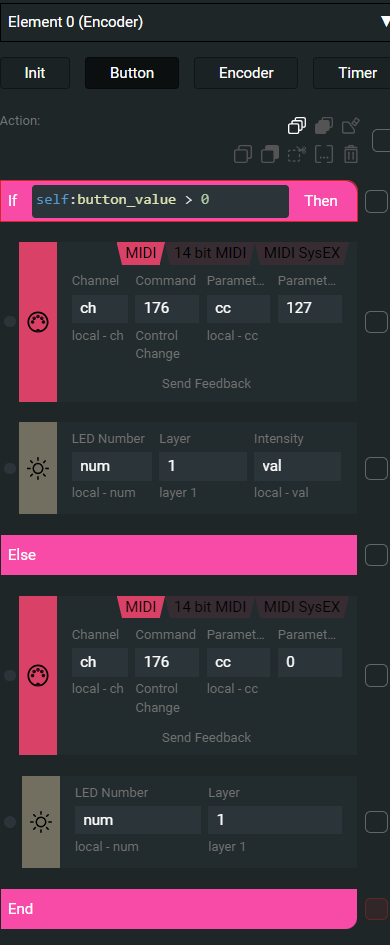
On the ‘init’ tab, I have turned off ‘Beautify’ on ‘Layer 2’. I only do this because I want the LED to be off unless the button is pressed. With ‘Beautify’ on, the LED will always be dimly lit. This is absolutely not necessary. I just do it for clarity.

In Ableton, you’ll need to map the button to the big multi-purpose button on the ‘Looper’ device. I have tested this and it works perfectly except for ‘Undo/Redo’. If I push and hold the Grid button, ‘Looper’ responds by switching states between playback and overdub. It will eventually undo but we want it to only undo and not toggle the playback/overdub state. There should be a way to accommodate this but I’m not quite sure how at the moment.

Edit: The ‘undo’ bug is a known issue since 2011. We would need to use a second button just for ‘undo/redo’:

https://forum.ableton.com/viewtopic.php?t=242012

Edit 2: I’ll think through the LED stuff today and see what I can come up with.

Using LUA, my thoughts would be to set a ‘led_state’ variable that, is initialized to ‘0’. When state is ‘0’, the LED is off. When a button press is received, set the ‘led_state’ to ‘1’ and flash red. On the next button press, change ‘led_state’ to 2 and make the LED solid green. On the next button press, change ‘led_state’ to 3 and flash “whatever color you want to indicate overdubbing”. On subsequent button presses, change the ‘led_state’ between ‘2’ and ‘3’. On double-click, set ‘led_state’ back to ‘0’.

It would just be a matter of translating the above logic into code but that should work. I’ll poke at it to see if I can make it work. :smiley:

1 Like

Your help is very appreciated - thank you!

I setup the button exactly as described. Still no light on/off - but according to your latest message, that’s what you’re working on next?

Your idea of different LED states indicating record, overdub and play would be amazing!

I have an adjacent button mapped to 2 buttons in the looper: ‘stop’ and ‘clear’.
So I’m thinking that action would have to somehow reset the LED state configuration.

Practically speaking I am playing songs live with guitar and vocals + tracks from Ableton.
The looper is set up on the vocal track. It’s meant to create quick and easy harmonies over refrains.

I’ve got a fader mapped to the volume of an insert track and a pot mapped to a reverb on that insert track. Everything on the insert track only affects the looper. And when recording and overdubbing everything happening on that insert track is recorded into the looper replacing what was there.
I followed this video for the insert track: https://www.youtube.com/watch?v=YO-y9u05F6k

1 Like

Yup. Working on this. However, problem 1:

  • Double-clicking to reset the ‘led_state’ doesn’t really work here as double-clicking stops the loop and doesn’t clear it.

We always needed to use two buttons; one for transport control and one for clearing the loop. I could certainly think of a way to have the ‘clear’ button also reset the LED states.

If you had an EF44 (4 faders and 4 clickable encoders), I could think of some slick ways to set it up to control 4 Looper devices and use the fader to cross-fade between the live input and the loop. But, you don’t have an EF44.

So, what I would envision is something like two ‘channels’ on the PBF4 per looper for control over 2 Looper devices. Channel one and two faders could be for live input and looper volumes. Buttons 1 and 2 could be for transport control and loop clearing. You could use the pots for maybe an effects send.

I can approximate this setup on my EF44 as it has all of those elements. It’s just that two of them, pot and button, are on one physical element; encoder.

Let me sort through this all. Some things that I know can be done but have not tackled are the ‘led_state’ logic. It should be doable and relatively easy. I’ve also not tackled making the LED flash. There’s documentation on it though.

This will take a little bit to sort through though. So, for now, you can stick with the one-button transport stuff :slight_smile:

1 Like

I assume because of this setup, you really only need control over 1 Looper device?

Yes, for now.

Simple is good!

1 Like

Christopher was faster than me and above all more efficient! You should work for Intech!

2 Likes

@kertikristof I am working on code to solution for the above. I can get all of the logic to work but what I would like to do, and cannot do, is have access to 3 layers of colors for an element. Just from an LED color perspective, I want to:

  • Set the LED to red on the initial click.
  • Set the LED to green on the second click.
  • Set the LED to yellow on the third click.
  • Toggle between green and yellow for all subsequent clicks.
  • Set LED off and re-initialize.

The following code performs the logic flawlessly. Note that ‘l’ is set to nil from a second element’s button press. This is by design for the above problem.

local n, b, ch, cc = self:element_index(), self:button_state(), 15, 49;
if b > 0 and l == nil then
	l = 1;
	print("Red")
	led_value(n, 1, 100)
elseif b > 0 and l == 1 then
	l = 2;
	print("Green")
	led_value(n, 2, 100)
elseif b > 0 and l == 2 then
	l = 3;
	print("Yellow")
	led_value(n, 3, 100)
elseif b > 0 and l == 3 then
	l = 2;
	print("Green")
	led_value(n, 2, 100)
elseif self:button_value() == 2 then
	l = nil;
	led_value(n, 1, 0)
	print("Off")
end

After spending a lot of time wondering why I couldn’t get the colors to change using 3 layers, I referenced the docs to learn that you can only have 2 layers. I was able to declare 3 layers on the ‘init’ tab and things seemed to work somewhat. Initial click set red, next click went yellow. Re-initialize click set things to green.

So, the problem is that we are limited to 2 layers. Is it possible to increase the number of color layers available? I can certainly declare as many layers as I want but the led_value() function is limited to 1-2 for the second parameter.

If this could be addressed, that would be fantastic! For now, I can set the LED to pulsate when in overdub instead of yellow. My goal was to use all 3 colors with some nice pulsating effects but I’ll sort it out with two colors and appropriate pulsating for now.

EDIT: I’m thinking of a workaround that stores the RGB values in an array that the led_color() function would pull its RGB parameters from. Can I declare an array that can be read from the ‘init’ tab and written to from the ‘Button’ tab? I don’t know how scope impacts arrays or the proper way to declare them for inter-element visibility.

EDIT 2: In fact, using an array to store RGB values would let me get away with 1 layer and that would save me some character count :slight_smile: I think…

That’s a miracle then! There are only two layers, because layers are essentially used to mix the button interaction with encoder rotations. Moreover only the encoder control element or TEK2’s endless rotary control element have 2 layers for LED control.

  • layer 1: the button interaction
  • layer 2: the rotation interaction

When you press an encoder, while it is rotated to a value, the two led layer’s value will be mixed together to get the resulting color. They often “burn out” to white, but you can test this if you set the led intensities lower and mix a blue with red for a purple color.

Your idea about declaring led colors in tables is legit, I usually do that.

You can do that either globally on system event’s init like

colors = {
{255,0,0},
{125,50,0}
}

Or if you want it element scoped on init, then

self.colors = {
{255,0,0},
{125,50,0}
}

Probably instead of colors, just use c or similar short character variable name to spare characters.

Also on a event, you could use the first color from the table like this, layer is 1 or 2 if encoder:

led_color(self:element_index(), LAYER, self.c[1][1], self.c[1][2],self.c[1][3])
1 Like

Making some progress here. I am defining a function rgb() that is handling all of the colors and animations. I literally just tested it as working 60 seconds ago!

So, nearly have this sorted out. The only thing I didn’t account for is the double-click to stop the Looper. I’m running out of characters to use so that might have to be programmed on button two.

Yup. I read the manual and discovered the two layers. It was doing some weird stuff so something was broken but made it seem like it was working.

I’m defining a function that handles all of the LED color, animations etc. It’s working really well except I can’t seem to set the LED to off.

I also need to work out double-clicking. I want double-click to turn LED off. I assume I’ll need to check timers to validate a double-click. I’ve not used timers yet.

Timer is helpful in that case and also the self:button_elapsed_time() which returns the last time a button has been pressed.

This config changes the color of the led on a long press, might give an inspiration for you.

1 Like

This is what I’m defining on the 'System - ‘init’ ’ tab:

function rgb(l, r, g, b, i, s, t)
	self.e = self:element_index()
	led_color(l, r, g, b, 1)
	led_value(self.e, l, i)
	led_animation_rate(self.e, l, s)
	led_animation_type(self.e, l, t)
end;

I’m then using this for the button presses to control the multi-use transport control:

local ch, cc, v, s = 15, 49, self:button_value(), self:button_state()
if s > 0 and c == nil then
	midi_send(ch, 176, cc, 127)
	rgb(1, 255, 0, 0, 85, 1, 3)
	c = 1
elseif s > 0 and c == 1 then
	midi_send(ch, 176, cc, 127)
	rgb(1, 0, 255, 0, 85, 0, 3)
	c = 2
elseif s > 0 and c == 2 then
	midi_send(ch, 176, cc, 127)
	rgb(1, 0, 255, 255, 85, 1, 3)
	c = 3
elseif s > 0 and c == 3 then
	midi_send(ch, 176, cc, 127)
	rgb(1, 0, 255, 0, 85, 0, 3)
	c = 2
elseif v == 2 then
	rgb(1, 255, 0, 0, 0, 0, 3)
	c = nil
end

I definitely follows the LEDs as I want and it sends the values and sets ‘c’ as I need. I am resetting c to nil from a second button by setting button_value() to 2 (user only has buttons and not encoders like I’m testing on otherwise I would use a left/right turn for these features). The reset works but sets the LED red instead of off…and I see my error…

rgb(1, 255, 0, 0, 0, 0, 3)

Now, I need to check for double clicks. When double clicking, set c to 2 and turn LED off. That would be stopping the Looper.

Cheers for the direction here as well. Going to look into the timers. I’m guessing I’ll need to clean things up to squeeze in more characters.

Oh, one last thing, if I define the function on the element ‘init’ tab, is it scoped only for that element? Or is it available globally? I’m using the system ‘init’ tab so that I could use the function on any element.

Function scope examples:

-- global scoped function
function test_1()
  print('test_1')
  return;
end;

-- call it anywhere like
test_1()

-- element scoped function
self.test_2 = function()
  print("test_2")
  return;
end;

-- call it with scope
self.test_2()
element[INDEX].test_2()
1 Like

@alxmackenzie

I should have this working this evening after my workday. I went down a rabbit hole trying to get things setup for one encoder function.

Your setup requires two buttons so this will be easy to accommodate.

My setup would use an encoder so I can do things with left/right turn to undo/redo/clear. (and, I don’t even use Ableton Looper but I want to write the code so that I can share it for people using an EF44)

So, the setup will work like this when it’s ready:

Button 1

  • First click starts recording - Pulses red.
  • Second click stops recording and starts playback - Solid green
  • Third click starts overdub - Pulses light blue
  • Subsequent clicks toggle between playback and overdub with respective color behaviors

Button 2

  • Single click stops playback and sets up button 1 to start playback again - LED off.
  • Long-press clears the loop and sets up button 1 to start recording again.

I’ve done these in monolithic LUA scripts. However, I’m going to reformat them so that you have the variables ‘Action Block’ which makes it easier for you to assign the MIDI channel and CC that you want to use. I’ll detail how to change the LED color if what I’ve chosen does not work for you. This will all come with instructions and screen snips so you can get this setup.

Cheers!

Christopher

Excellent.

You should be getting paid for this :smiley:

Knowledge is my reward :wink:

And, I love these controllers and want to pitch in and help others enjoy them as well :slight_smile: They’re incredibly flexible and well-designed.

@alxmackenzie

I have my code working perfectly as intended. However, when testing this, some issues came up. The Looper device does not behave as expected.

Issue 1: Controlling the Looper with the multi-use transport button is flakey. This is apparently resolved by using relative MIDI but it’s still flakey as there’s about 10 different types (including absolute etc.) and I’ve not the patience to try all of them out.

Solution (simple but not yet implemented): Map MIDI CCs directly to the small transport controls above the multi-use button.

Issue 2: Overdub does not behave as expected. My code was designed under the assumption that overdubbing remains active until instructed to stop. This is not the case. Overdub immediately punches-in and stops at then end of the loop. This causes my slick LED color coding to go out-of-sync.

Solution (a little trickier due to character constraints. not yet implemented): Instead of making the LED stay a solid color for the expected overdub behavior (stay lit until we press it again the go back to green for playback state of looper), flash the LED for a brief period to indicate that an overdub event was triggered. This will not stay in sync with the actual overdubbing. However, because I assume most loops aren’t terribly long, have the LED flash for 5 - 10 seconds before going back to solid green, would be enough of a visual feedback to know you’ve engaged overdubbing.

The LED flashing bit might be trickier because of the character limit constraints. However, I can likely prune a bunch of code out because I don’t really need to track LED states anymore (other than to reset things when the loop is cleared).

I wish the overdub behavior worked like the other handful of loopers I’ve used. :expressionless:

EDIT: To also clarify, an Ableton Remote Script would/should be able to send information back to the Grid controller for all of the various state changes of the Looper (or any native devices/DAW elements). With that incoming data, the LEDs could be made to do all sorts of things. Unfortunately, Ableton Remote Scripts are not currently on my radar to dig into. Nor would the midi_rx work to get all the LEDs lit up in a slick fashion with that data. That’s all a bit more than I can chew off.

1 Like

I think I see what the actual problem is. I am sending the same CC each button press and that’s messing it up. It was orignally coded to work with the multi-use button. I’ll address this tomorrow, test and post back. I sounds like I can get it setup as I originally intended. Glad I looked further at the behavior because the overdub stopping like it was was rather confusing.

Edit: Got it working! Need to make coffee and breakfast but I’ll get the setup instructions screen snipped and posted when I have a moment this morning. :smiley:

I might start a new thread though with a new title so that, if someone is looking for the same or similar feature, they can more easily find the information.

1 Like

Awesome! Will try it all out later today.

1 Like